|
 |
 |
Replacing
the element in your shower head
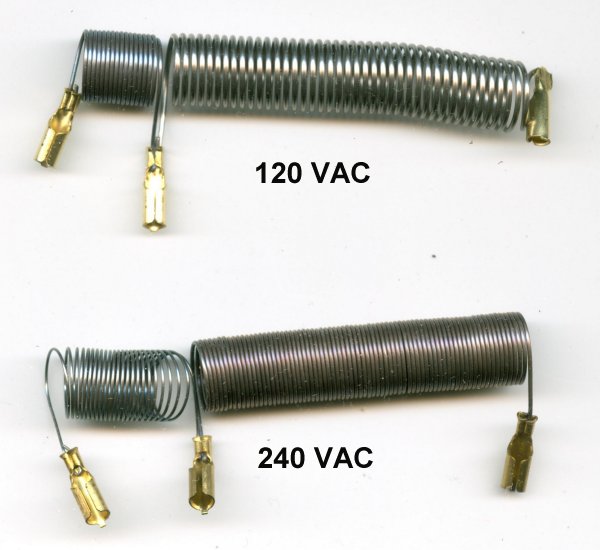
We sell replacement heating elements for this
shower head. Both 120 and 240 VAC heating elements are
available.. Price= 12 US Dollar per
element + 3 USD shipping no matter how many you buy.
Contact me at email at bottom |
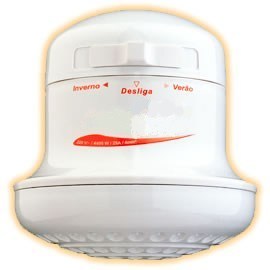
Shower head with integral water heater built in. Use
for space restricted and portable
applications such as boats, pool, camp facilities and RV. You can
have a fully functional
hot water shower system at a fraction of the normal equipment cost
and installation time
normally required. This self-contained shower system only uses
electricity when operated.
The units are "on-demand" and "tankless" and
therefore only need a single water source to
operate. When installed, they provide an INSTANT hot shower in
three different temperature
settings set with a switch. Simpler setup than with a water
heater. Less to go wrong and
easier to install and maintain. 220 volts 3200 watts min, 5400
watts maximum.
Great for installing in your cabin ! The unit will operate
properly with lower water
pressures commonly found on Boats and RV's.
Installation steps Summary:
1) Remove your existing shower head.
2) Twist on your electric shower head to the existing bathroom
standard
threaded pipe.
3) Install a 30A (220v version ) double pole circuit breaker
to your existing breaker
box and run wires to the shower head unit. See circuit
current requirements in table below.
4) Connect the power wires to the shower
head unit. It is then ready for use.
See the detailed instructions below for more details.
|
Attention!
Carefully read
the instructions of the product before effecting
its
installation. Save
this manual for future reference
Table
of CHARACTERISTICS
Voltage
120 V
220 V
Watts
Low 3000 W
3000 W
High 5000 W
5000 W
Current
45 A
25 A
Water
pressure 10kPa
400kPa
Input
Pipe 1/2
inch male standard pipe thread
Water
Resistivity
>1.3 ohm x cm
(resistivity
means water cannot be extremely hard )
|
| PREPARATION
FOR ELECTRIC INSTALLATION |
|
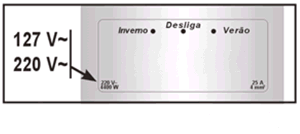
The
voltage of the product corresponds to the voltage
of the power line required (127 V~ or 220 V~) (
see Figure 1);
Fig
1
Verify a
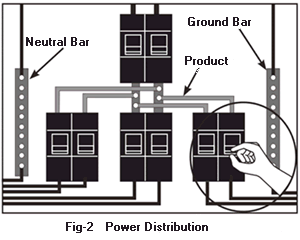
direct line from the breakers. Refer to the diagram of
electrical distribution (see Figure 2) using wires
and protection (breaker), considering the values of
voltage, current.
Use
a bipolar breaker for 220 V~ (phase-phase) and
single-pole breaker for 127V~ and 220 V~ (phase-neutral);
Disconnect
the breaker in the circuit in which the shower head
will be installed before initiating the installation (
sees Figure 2).
|
| Plumbing |
Open
the pipe and let it run enough cold water to remove any
sedimentation from the pipe
The
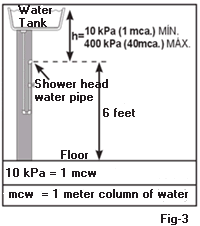
water pressure supplied to the shower head is 10-400
kPa. This corresponds to a column of water as
diagrammed in figure 3. If using a water
tank you can work directly from the diagram observing
the water column heights.
|
If the
plumbing does not have 1/2" thread, use an adapter.
The height
of the water box must be at least 1 meter above the point of
the shower head for use with cistern.
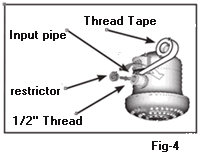
For pressure
between 80 and 400 kPa (8 and 40 mca.) or water source
proceeding from city water, it is necessary
to install
the reducer in the water nipple input. ( see Figure 4)
Install
the water connection and fill with water before making the
electrical connection ,
this
prevents burnout of the resistance heating element. Always
repeat this operation should the product be
removed.
SETTING
Of the SUPPORT Of the DIVERTER
Fix the
support on the wall at a height adjusted for the reach
of your hands. ( sees Figure 5) Take
care not to perforate the plumbing in the wall
(If piping
work is required. You can also install on existing output pipe if
you already have).
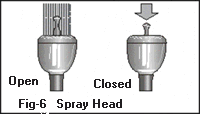
To open or
to close the hose head see Figure 6
| ELECTRIC
INSTALLATION |
|
Connect
the leads of the product to the electric wiring, use
an adequate connector such as wire nuts;
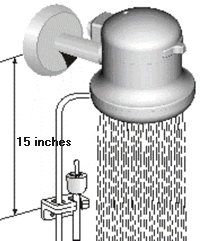
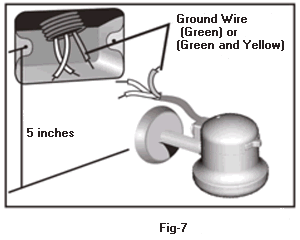
The
ideal height of the junction (exit of wires) is of 1
foot above of the water exit (it see figure 7);
Use
no type of plug for the installation of the product to
prevent errant hands fiddling.
|
| Attention |
|
IMPORTANT
FOR SECURITY:
To
prevent risks of electric shocks, connect the ground
wire of the product to a grounding system.
DO
NOT use the Neutral wire as a ground !
Proper grounding
system insures security during the usage.
The
system should be installed by a qualified
professional.
A good ground is attained with metallic
connecting rods in the ground, with a maximum
impedance of 10 ohm (Fig.7).
|
|
USE
OF THE PRODUCT
|
|
|
After
the installation the product is ready to
function:
Replace the breaker in the breaker box that the
product uses;
Set
the Invierno (winter) or Verano (summer) button in
the desired position (see Figure. 1) Winter setting heats
the water more than the Summer setting;
Opening
the water valve causes the product turns on automatically;
To
change the temperature, close the water valve
and place the selector button in the desired position;
The
water temperature also can be regulated using the
water valve by increasing or diminishing the outflow of
the water. More water with the same heat input to it
yields cooler water. Less water heated by the same
power results in warmer water. The power is constant with
a given setting.
Comment: For
your security and greater life of the components in the
product, only change the selector button with
the water valve closed.
| CLEANNESS
And MAINTENANCE |
|
Before
cleaning, it disconnect the breaker to the product.
Use
a damp cloth only, abrasive cleaners can
damage the product;
|
|
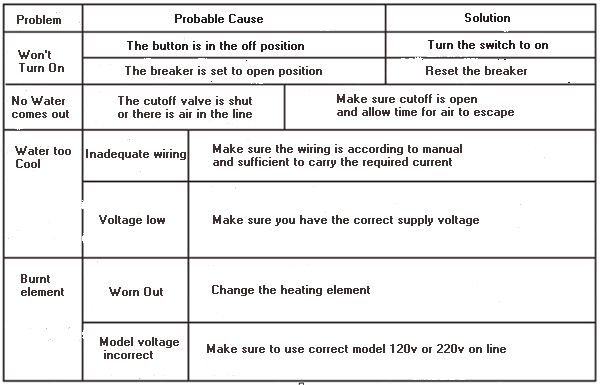
Problems
And Solutions Refer to figure 8 for common problems
with installation and their respective solutions.
|